최신 Tailwind CSS를 Vanilla에서 사용하는 방법을 알아봅시다
Tailwind CSS에서 제공하는 링크(바로가기)를 들어오시면
‘Play CDN’탭을 클릭해주세요

Tailwind CSS를 바닐라 HTML, CSS에 사용하는 방법
<!doctype html>
<html>
  <head>
    <meta charset="UTF-8" />
    <meta name="viewport" content="width=device-width, initial-scale=1.0" />
    <script src="https://cdn.jsdelivr.net/npm/@tailwindcss/browser@4"></script>
  </head>
  <body>
    <h1 class="text-3xl font-bold underline">
      Hello world!
    </h1>
  </body>
</html>
핵심은 cdn으로 Tailwind CSS 라이브러리를 가져오는 아래 코드입니다.
<script src="https://cdn.jsdelivr.net/npm/@tailwindcss/browser@4"></script>
위 코드만 복붙해서 입력하시면 됩니다~
@layer components 혹은 @layer base 혹은 @utility something를 적용하고 싶으시다면
<style type="text/tailwindcss"> 를 사용한 style 태그에 넣어주시면 됩니다.
<style type="text/tailwindcss">
    @layer components{
        .flex-center {
            @apply flex justify-center items-center;
        }
    }
</style>
전체 코드는 이렇습니다
<!DOCTYPE html>
<html lang="ko">
<head>
    <meta charset="UTF-8">
    <meta name="viewport" content="width=device-width, initial-scale=1.0">
    <title>Tailwind CSS v4 CDN 예제</title>

    <!-- 1. Tailwind CSS v4 브라우저 CDN 스크립트 -->
    <!-- 이 스크립트는 type="text/tailwindcss"로 지정된 스타일을 처리합니다. -->
    <script src="https://cdn.jsdelivr.net/npm/@tailwindcss/browser@4"></script>

    <!-- 2. 사용자 정의 Tailwind CSS 스타일 -->
    <style type="text/tailwindcss">
        @tailwind base; /* 선택 사항: CDN이 기본 스타일을 일부 제공할 수 있음 */
        @tailwind components;
        @tailwind utilities;

        @layer base {
            body {
                @apply bg-gray-100 font-sans p-4; /* 회색 배경, 기본 폰트, 패딩 적용 */
            }
        }

        @layer components {
            /* 요청하신 flex-center 컴포넌트 */
            .flex-center {
                @apply flex justify-center items-center; /* 가로 세로 중앙 정렬 */
            }

            /* 버튼 스타일 컴포넌트 예시 */
            .버튼 { /* 클래스 이름은 영문/숫자/-_ 만 사용하는 것이 일반적이나, 데모용으로 한글 사용 */
                @apply py-2 px-4 font-semibold rounded-lg shadow-md;
            }
            .파란색-버튼 {
                @apply bg-blue-500 hover:bg-blue-700 text-white;
            }
            .초록색-버튼 {
                @apply bg-green-500 hover:bg-green-700 text-white;
            }
        }

        @layer utilities {
            /* 사용자 정의 유틸리티 예시 */
            .멋진-텍스트 {
                @apply text-purple-600 italic; /* 보라색, 이탤릭체 */
            }
        }
    </style>
</head>
<body>

    <div class="container mx-auto"> <!-- 전체 컨텐츠를 감싸는 영역, 가로 중앙 정렬 -->
        <h1 class="text-3xl font-bold mb-6 text-center text-blue-700">
            Tailwind CSS v4 CDN 데모 페이지
        </h1>

        <!-- .flex-center 컴포넌트 사용 예시 -->
        <div class="flex-center h-48 bg-indigo-200 rounded-lg shadow-md mb-6">
            <p class="text-xl text-indigo-700">
                이 컨텐츠는 <code class="bg-indigo-100 px-1 rounded text-sm">.flex-center</code> 클래스로 중앙 정렬되었습니다.
            </p>
        </div>

        <!-- 다른 커스텀 컴포넌트 사용 예시 -->
        <div class="space-x-4 mb-6 text-center">
            <button class="버튼 파란색-버튼">
                파란색 버튼
            </button>
            <button class="버튼 초록색-버튼">
                초록색 버튼
            </button>
        </div>

        <!-- 커스텀 유틸리티 사용 예시 -->
        <p class="멋진-텍스트 text-center text-lg">
            이 텍스트는 사용자 정의 유틸리티 클래스를 사용합니다.
        </p>

        <!-- 일반 Tailwind 유틸리티 클래스 사용 예시 -->
        <div class="mt-8 p-6 bg-white rounded-lg shadow-xl">
            <p class="text-gray-800">
                이 영역은 일반적인 Tailwind 유틸리티 클래스 (예:
                <code class="bg-gray-200 px-1 rounded text-sm">mt-8</code>,
                <code class="bg-gray-200 px-1 rounded text-sm">p-6</code>,
                <code class="bg-gray-200 px-1 rounded text-sm">bg-white</code> 등)를 사용하여 스타일링 되었습니다.
            </p>
        </div>
    </div>

</body>
</html>
tailwind를 main.css 파일로 저장하고 index.html에서 불러오는 방법
위 파일을 main.css라고 저장했다면
아래 코드로 main.css를 불러올 수도 있구요
<link rel="stylesheet" href="main.css" type="text/tailwindcss">
자세한 코드는 아래에 첨부하겠습니다
index.html 코드
<!DOCTYPE html>
<html lang="ko">
<head>
    <meta charset="UTF-8">
    <meta name="viewport" content="width=device-width, initial-scale=1.0">
    <title>Tailwind CSS v4 CDN - 외부 CSS 예제</title>

    <!-- 1. Tailwind CSS v4 브라우저 CDN 스크립트 -->
    <!-- 이 스크립트는 type="text/tailwindcss"로 지정된 스타일과 링크된 CSS를 처리합니다. -->
    <script src="https://cdn.jsdelivr.net/npm/@tailwindcss/browser@4"></script>

    <!-- 2. 외부 CSS 파일 (main.css) 불러오기 -->
    <!-- 중요: type="text/tailwindcss" 속성을 반드시 추가해야 합니다! -->
    <!-- 이 속성이 있어야 CDN 스크립트가 main.css 파일 내의 Tailwind 구문을 처리합니다. -->
    <link rel="stylesheet" href="main.css" type="text/tailwindcss">

</head>
<body>

    <div class="container mx-auto"> <!-- 전체 컨텐츠를 감싸는 영역, 가로 중앙 정렬 -->
        <h1 class="text-3xl font-bold mb-6 text-center text-blue-700">
            Tailwind CSS v4 CDN 데모 페이지 (외부 CSS)
        </h1>

        <!-- .flex-center 컴포넌트 사용 예시 (main.css에 정의됨) -->
        <div class="flex-center h-48 bg-indigo-200 rounded-lg shadow-md mb-6">
            <p class="text-xl text-indigo-700">
                이 컨텐츠는 <code class="bg-indigo-100 px-1 rounded text-sm">.flex-center</code> 클래스로 중앙 정렬되었습니다. (main.css 정의)
            </p>
        </div>

        <!-- 다른 커스텀 컴포넌트 사용 예시 (main.css에 정의됨) -->
        <div class="space-x-4 mb-6 text-center">
            <button class="버튼 파란색-버튼">
                파란색 버튼 (main.css 정의)
            </button>
            <button class="버튼 초록색-버튼">
                초록색 버튼 (main.css 정의)
            </button>
        </div>

        <!-- 커스텀 유틸리티 사용 예시 (main.css에 정의됨) -->
        <p class="멋진-텍스트 text-center text-lg">
            이 텍스트는 사용자 정의 유틸리티 클래스를 사용합니다. (main.css 정의)
        </p>

        <!-- 일반 Tailwind 유틸리티 클래스 사용 예시 -->
        <div class="mt-8 p-6 bg-white rounded-lg shadow-xl">
            <p class="text-gray-800">
                이 영역은 일반적인 Tailwind 유틸리티 클래스 (예:
                <code class="bg-gray-200 px-1 rounded text-sm">mt-8</code>,
                <code class="bg-gray-200 px-1 rounded text-sm">p-6</code>,
                <code class="bg-gray-200 px-1 rounded text-sm">bg-white</code> 등)를 사용하여 스타일링 되었습니다.
            </p>
        </div>
    </div>

</body>
</html>
main.css 코드
/* main.css */

/*
  Tailwind CSS v4 CDN (@tailwindcss/browser)을 사용할 때,
  이 지시어들은 CDN 스크립트에 의해 처리됩니다.
  외부 CSS 파일에서도 명시적으로 포함하는 것이 좋습니다.
*/
@tailwind base;
@tailwind components;
@tailwind utilities;

/* 기본 스타일 레이어 */
@layer base {
    body {
        @apply bg-gray-100 font-sans p-4; /* 회색 배경, 기본 폰트, 전체 패딩 */
    }
}

/* 컴포넌트 레이어 */
@layer components {
    /* 요청하신 flex-center 컴포넌트 */
    .flex-center {
        @apply flex justify-center items-center; /* 가로 세로 중앙 정렬 */
    }

    /* 버튼 스타일 컴포넌트 예시 */
    /* 실제 프로젝트에서는 클래스 이름을 영문, 숫자, 하이픈(-), 언더스코어(_)로 작성하세요. */
    .버튼 {
        @apply py-2 px-4 font-semibold rounded-lg shadow-md;
    }
    .파란색-버튼 {
        @apply bg-blue-500 hover:bg-blue-700 text-white;
    }
    .초록색-버튼 {
        @apply bg-green-500 hover:bg-green-700 text-white;
    }
}

/* 유틸리티 레이어 */
@layer utilities {
    /* 사용자 정의 유틸리티 예시 */
    .멋진-텍스트 {
        @apply text-purple-600 italic; /* 보라색, 이탤릭체 */
    }
}
마무리 추천 글 & 사이트
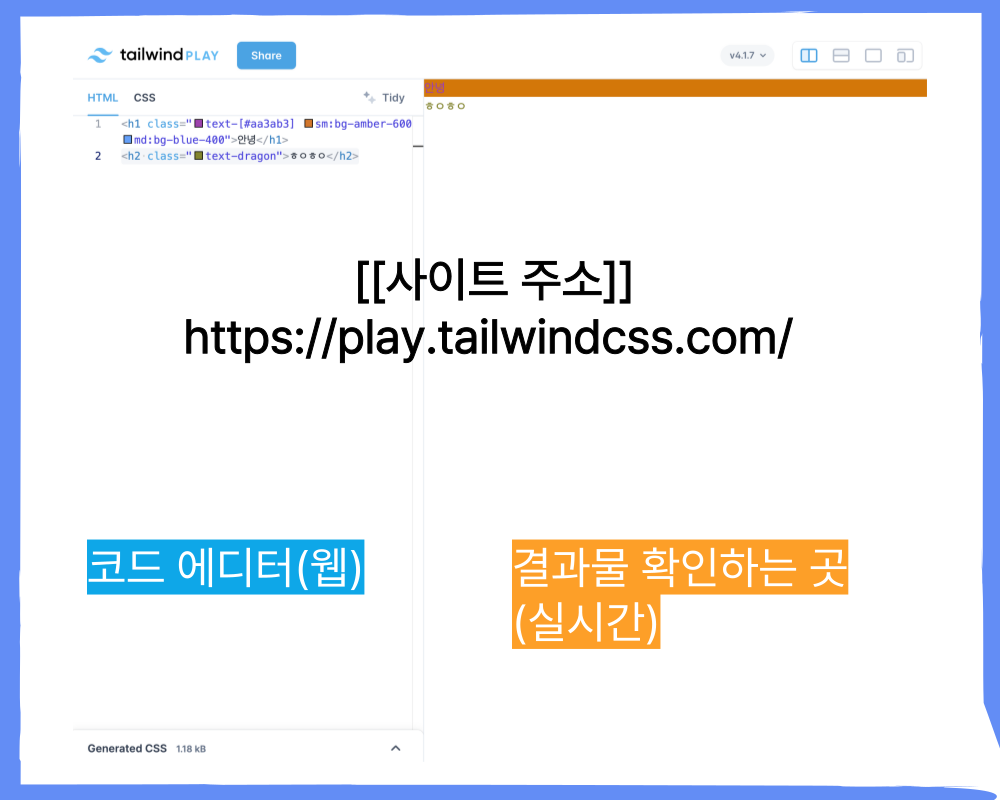
Tailwind CSS Play (온라인으로 바로 문법 확인 가능)
사이트 주소 : https://play.tailwindcss.com/
들어가면 아래와 같은 모습인데,
왼쪽 코드 에디터 부분에 코드입력하고 수정하면, 오른쪽에 실시간으로 결과가 반영된다 ㅇㅇ